Synology
Environment
Description
Some notes about Synology DSM 5.0/5.1.
Repositories
Besides the official Synology repository, you can add:
Virtualization
It's possible to run DSM into VMware. Excellent tutorial (in French) here: http://www.sky-future.net/2014/06/installer-synology-dsm-5-0-vmware/
The machine will be recognized as follows by Synology Assistant:
Mail server
Aliases
postmaster and abuse aliases can be added to /volume1/@appstore/MailServer/etc/aliases.
Then you need to reload the configuration:
> /volume1/@appstore/MailServer/bin/newaliases
> /volume1/@appstore/MailServer/sbin/postfix reload
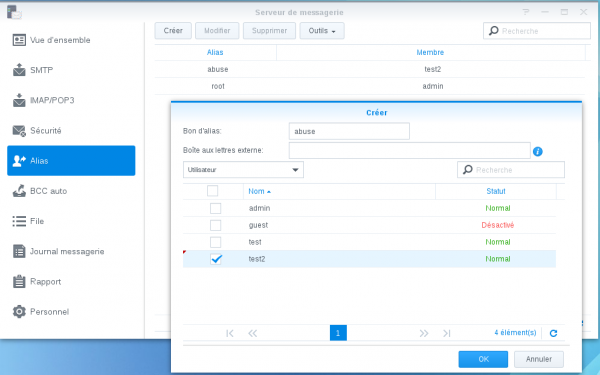
You can also manage aliases from the GUI:
Mail Client
RoundCube
At the time of this writting, RoundCube v1.0.2 will be installed if you install the "MailStation" package. The current version is 1.0.3 and you will have to manually upgrade your RoundCube setup if you want to install plugins (e.g. Calendar).
It's highly not recommended to do that because it will break the package and it's very likely to cause data loss when the package will be updated.
Horde
Installation of Horde
Prerequisites
Install following packages:
- Perl (required by MailServer)
- MailServer
- MariaDB (required by Horde)
- PHP PEAR (required by Horde)
Configure:
- MailServer
- MariaDB (define the "root" password with mysqladmin -u root password 'P4SSW0RD' )
Enable SSH (Control Panel > Terminal & SNMP > Terminal)
Via packages
Install Horde from the "http://packages.synocommunity.com/" repository (you will need to enable "Beta" versions).
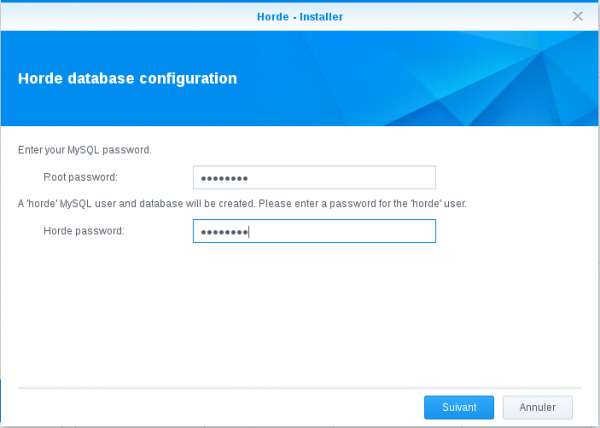
Define your MariaDB root password and a password for your Horde database:
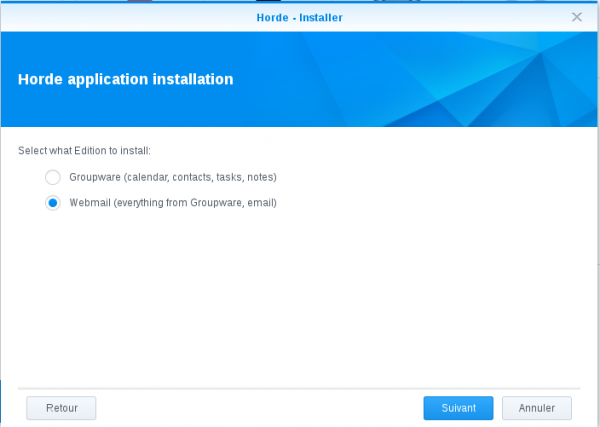
Select the Horde installation package mode (select the second option):
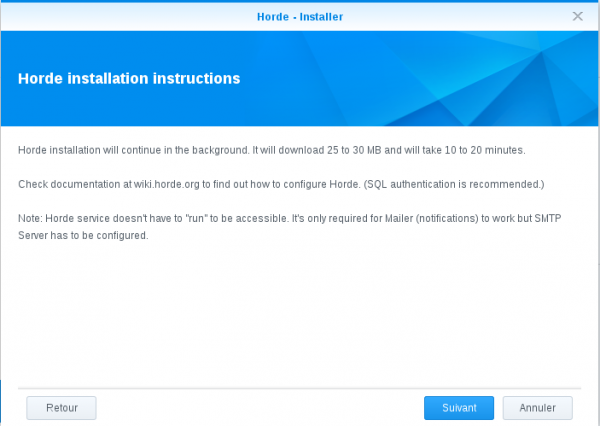
Click "Next":
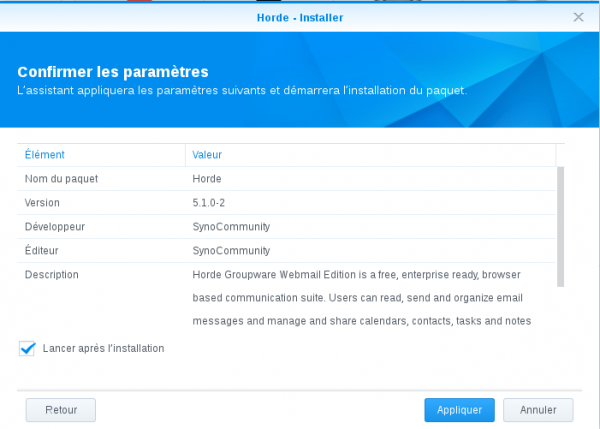
Click "Apply":
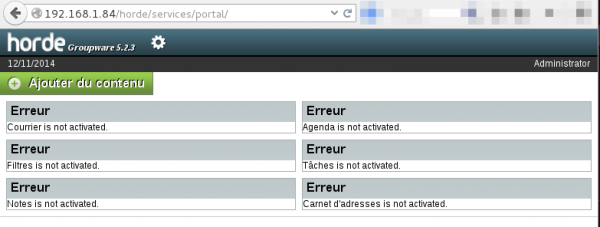
The installation will need around 20 minutes. Go to http://yourserver/horde/ to check the status:
When the installation is complete, you should have a similar screen:
Manual installation
As prerequisites, you will need to:
- Install MariaDB and PHP-PEAR packages. Set a password for MariaDB.
- Install Perl (required for Mail Server) and MailServer packages
Ensure the "Enable home user service" option is checked (Control Panel > Users > Advanced tab > User home section).
Once done, create a horde database:
DiskStation> mysql -u root -p
MariaDB [(none)]> create database horde;
MariaDB [(none)]> create user horde@localhost identified by 'Awes0meP455w0rD';
MariaDB [(none)]> grant all privileges on horde.* to horde@localhost;
MariaDB [(none)]> \q
Then proceed with the installation of Horde:
DiskStation> pear channel-discover pear.horde.org
DiskStation> pear install horde/horde_role
DiskStation> mkdir /volume1/web/horde/
DiskStation> pear config-set horde_dir /volume1/web/horde
DiskStation> pear config-set -c pear.horde.org horde_dir /volume1/web/horde
DiskStation> pear run-scripts horde/horde_role
[SNIP]
Filesystem location for the base Horde application : /volume1/web/horde
[SNIP]
DiskStation> pear install horde/webmail


Now, here is a workaround that I've found so that the webmail-install script can read the appropriate horde_dir value. Unless you run it as the admin user, you will have a critical error.
DiskStation> cp /root/.pearrc /volume1/homes/admin
DiskStation> su admin
$ /volume1/@appstore/PEAR/bin/webmail-install
[SNIP]

What database backend should we use?
    (false) [None]
    (mysql) MySQL / PDO
    (mysqli) MySQL (mysqli)
    (oci8) Oracle
    (pgsql) PostgreSQL
    (sqlite) SQLite
Type your choice []: mysql

Username to connect to the database as* [] horde

Password to connect with  Awes0meP455w0rD

How should we connect to the database?
    (unix) UNIX Sockets
    (tcp) TCP/IP
Type your choice [unix]: tcp

Database server/host* [] localhost

Port the DB is running on, if non-standard [3306] 3306

Database name to use* [] horde

Internally used charset* [utf-8] utf-8

Use SSL to connect to the server?
    (1) Yes
    (0) No
Type your choice [0]: 0

Certification Authority to use for SSL connections []

Split reads to a different server?
    (false) Disabled
    (true) Enabled
Type your choice [false]: false

[SNIP]
Now apply appropriate privs (you can now issue remaining commands as root):
DiskStation> chown -R http /volume1/web/horde/
DiskStation> chmod +w /volume1/web/horde/static/
Go to http://your.ip/horde/admin/config/ and follow the configuration (as explained below).
Configuration of Horde
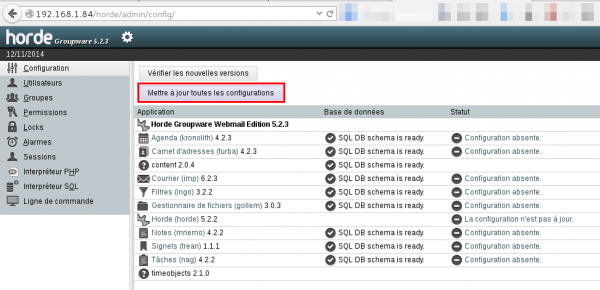
First of all, update all configurations from "Settings > Administration > Configuration". Click on "Update all configurations":
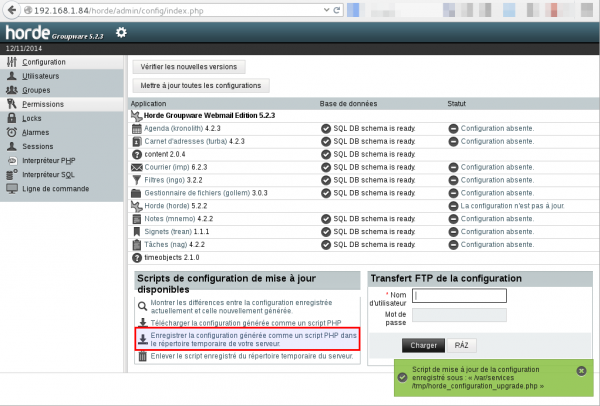
The automatic configuration will fail. Choose to save the configuration in the temporary folder:
Connect to the CLI (via SSH) and enter following command:
> php /var/services/tmp/horde_configuration_upgrade.php
Successfully saved backup configuration.
Saved horde configuration.
Saved imp configuration.
Saved ingo configuration.
Saved kronolith configuration.
Saved turba configuration.
Saved nag configuration.
Saved mnemo configuration.
Saved trean configuration.
Saved gollem configuration.
Self-destructing...
Upgrade script deleted.
Now, go to the configuration directory and backup the conf.php file:
> cd /volume1/web/horde/config/
> cp conf.php conf.2014.11.12.22.41.php
> vi conf.php
Modify the conf.php as follows:
 $conf['sql']['phptype'] = 'mysql';
 $conf['nosql']['phptype'] = false;
 $conf['ldap']['useldap'] = false;
-$conf['auth']['admins'] = array('Administrator');
+$conf['auth']['admins'] = array('admin');
 $conf['auth']['checkip'] = true;
 $conf['auth']['checkbrowser'] = true;
 $conf['auth']['resetpassword'] = true;
 $conf['auth']['alternate_login'] = false;
 $conf['auth']['redirect_on_logout'] = false;
 $conf['auth']['list_users'] = 'list';
-$conf['auth']['params']['username'] = 'Administrator';
-$conf['auth']['params']['requestuser'] = false;
-$conf['auth']['driver'] = 'auto';
+$conf['auth']['params']['app'] = 'imp';
+$conf['auth']['driver'] = 'application';
 $conf['auth']['params']['count_bad_logins'] = false;
 $conf['auth']['params']['login_block'] = false;
 $conf['auth']['params']['login_block_count'] = 5;

[SNIP]

 $conf['history']['driver'] = 'Sql';
 $conf['davstorage']['params']['driverconfig'] = 'horde';
 $conf['davstorage']['driver'] = 'Sql';
-$conf['mailer']['params']['sendmail_path'] = '/usr/lib/sendmail';
+$conf['mailer']['params']['sendmail_path'] = '/usr/sbin/sendmail';
 $conf['mailer']['params']['sendmail_args'] = '-oi';
 $conf['mailer']['type'] = 'sendmail';
 $conf['vfs']['params']['driverconfig'] = 'horde';
Start Horde daemon (only applies to installation from package)
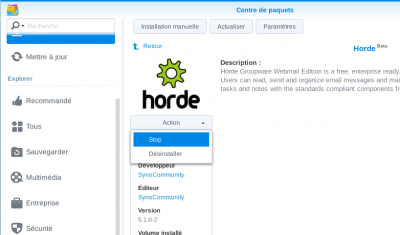
Horde daemon should be automatically started. If it's not the case, go to your packages manager > Horde and start it from the dropdown:
Grant users (only applies to installation from package)
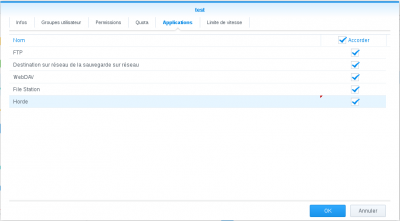
In DSM, go to Control Panel > User and click the user you want to grant the Horde privileges to. Then click Modify, go to "Applications" tab and check the "Horde" checkbox:
User profile and test
Now, logout from Horde admin and log in as a standard user. Go to Settings > Options > Personal and edit your profile (you need to define a default email to be able to send mails).
Send a mail to yourself and refresh to check that you have received it.

Cron
Add following lines to your /etc/crontab file (ensure fields are separated by TABS insteads of SPACES)
*/5     *       *       *       *       root    su - admin -c "/volume1/@appstore/PEAR/bin/horde-alarms"
0       2       *       *       *       root    su - admin -c "/volume1/@appstore/PEAR/bin/kronolith-agenda"
30      6       *       *       *       root    pear upgrade -c horde | sendmail -t [email protected]
Optional configuration
Enable cache (recommended)
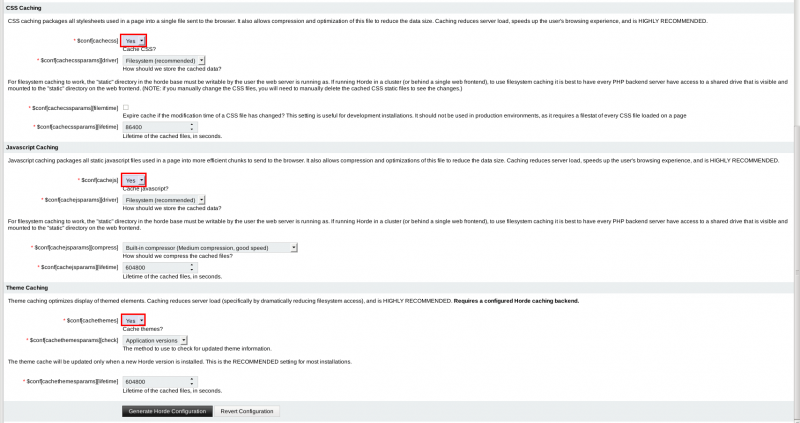
It is recommended to enable cache for CSS/JS/Theme. Go to Configuration > Horde > Caching Tab and enable Cache in the 3 below sections:
Enable PGP
If you want to use PGP within Horde, edit the configuration file (conf.php) and add the following line:
 $conf['sessionhandler']['hashtable'] = false;
 $conf['spell']['driver'] = ;
+$conf['gnupg']['path'] = '/usr/bin/gpg';
 $conf['gnupg']['keyserver'] = array('pool.sks-keyservers.net');
 $conf['gnupg']['timeout'] = 10;
 $conf['nobase64_img'] = false;
 $conf['image']['driver'] = false;
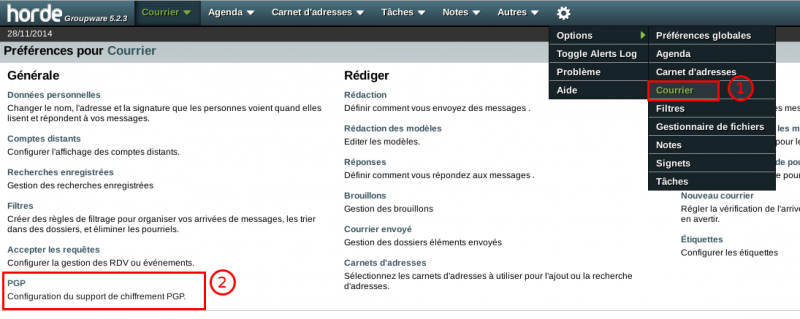
Then go to Settings > Options > IMP and click on PGP:
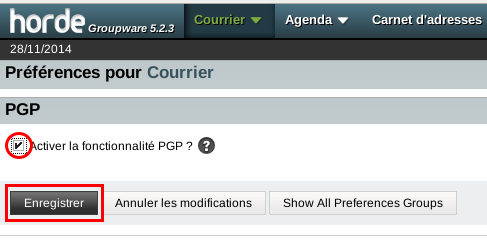
Then enable PGP:
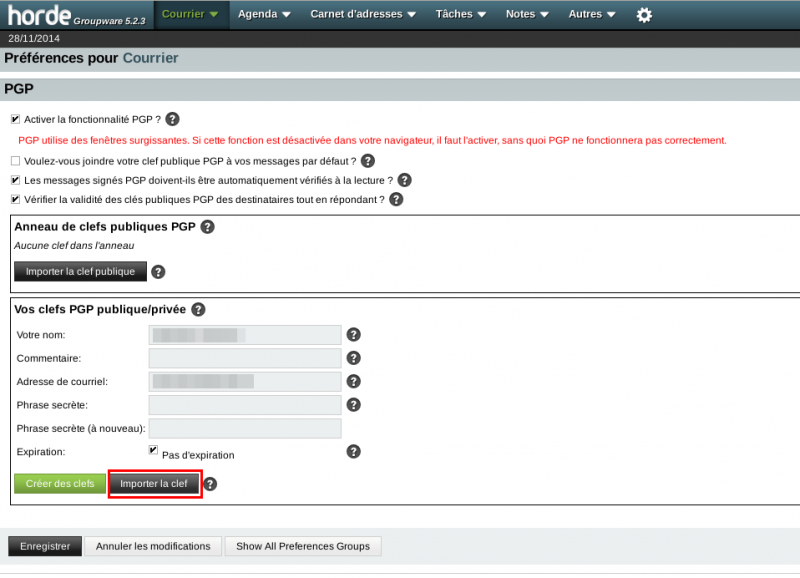
When you click the Save button, you're presented with the following screen:
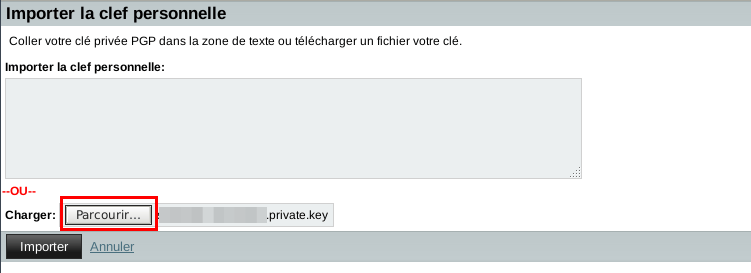
Click on Import key and use the browse button to locate your private key. Then click on Import:
Enable ActiveSync
First ensure you have installed the package:
DiskStation> pear install horde/horde_activesync
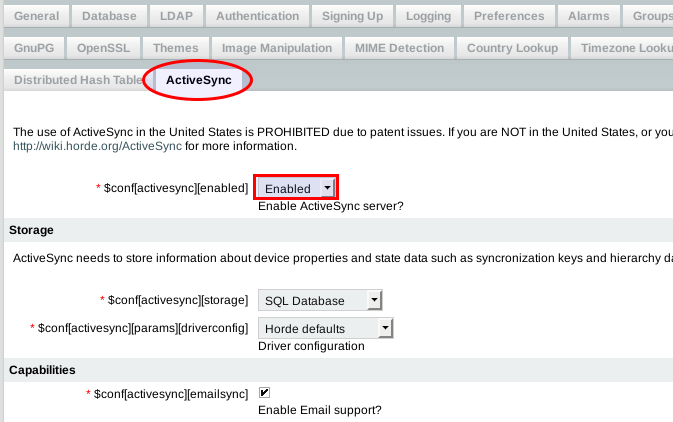
If you want to be able to synchronize a third-party client (e.g. iPhone) with Horde using an Exchange based configuration (synchronization of Email, Calendar, Contacts, Tasks, Memo), you must enable ActiveSync from Configuration > Horde > ActiveSync tab.
You must also modify your Apache configuration. Here is an example for Synology, using the user SSL configuration file (/etc/httpd/conf/extra/httpd-ssl.conf-user):
Listen 443

Include conf/extra/httpd-ssl.conf-common

NameVirtualHost *:443

#INCLUDE_SSL_VHOST_CONF#

<VirtualHost *:443>
    ServerName *
    ServerAlias *

    SSLEngine on

    <FilesMatch "\.(cgi|shtml|phtml|php)$">
        SSLOptions +StdEnvVars
    </FilesMatch>

    Alias /Microsoft-Server-ActiveSync /volume1/web/horde/rpc.php
    Alias /autodiscover/autodiscover.xml /volume1/web/horde/rpc.php
    Alias /Autodiscover/Autodiscover.xml /volume1/web/horde/rpc.php
    Alias /AutoDiscover/AutoDiscover.xml /volume1/web/horde/rpc.php
    RedirectPermanent /.well-known/caldav /horde/rpc.php
    RedirectPermanent /.well-known/carddav /horde/rpc.php

    BrowserMatch ".*MSIE [2-5]\..*" nokeepalive ssl-unclean-shutdown downgrade-1.0 force-response-1.0
    #CustomLog /dev/null "%t %h %{SSL_PROTOCOL}x %{SSL_CIPHER}x \"%r\" %b"
    CustomLog /var/log/httpd/user-access_log combined

    <IfDefine HSTS>
        Header set Strict-Transport-Security "max-age=31536000; includeSubDomains"
    </IfDefine>

    Include sites-enabled-user/*.conf
</VirtualHost>
Display emails in HTML
By default, emails are displayed in plain text (for security reasons). To enable emails to be displayed in HTML, edit /volume1/web/horde/imp/config/mime-drivers.php as follows:
[SNIP]
/* HTML driver settings */
'html' => array(
    /* NOTE: Inline HTML display is turned OFF by default. */
-   'inline' => false,
+   'inline' => true,
    'handles' => array(
    'text/html'
),
[SNIP]
Update Horde
If you have installed horde manually, you can update all horde packages with the below command:
DiskStation> pear upgrade -a -B -c horde
Known errors and fixes
data_dir
If you have the following error while accessing the Horde admin interface:
Database migration files not found. Please check PEAR's data_dir configuration setting.
... then create the following file:
/etc/httpd/sites-enabled-user/com.synocommunity.packages.horde.conf
And put the following in it:
SetEnv PHP_PEAR_SYSCONF_DIR /usr/local/horde/etc
Then, restart Apache, or maybe easier: reboot.
Fetch mail from Gmail
If you want to fecth mails from Gmail, one option is to use getmail from Pyropus.
syno> cd /volume1/homes/$USER/scripts/
syno> wget http://pyropus.ca/software/getmail/old-versions/getmail-4.48.0.tar.gz
syno> tar xzvf getmail-4.48.0.tar.gz
syno> ln -s getmail-4.48.0/ getmail
Now, create a configuration file as follows (replace the values of username, password and $USER fields with your own):
syno> mail> cat getmail_gmail.conf
[retriever]
type = SimplePOP3SSLRetriever
server = pop.gmail.com
username = [email protected]
password = yourpassword
[destination]
type = Maildir
path = /volume1/homes/$USER/.Maildir/
user=$USER
[options]
verbose = 0
message_log = /var/log/getmail_gmail.log
Test the following command:
syno> /volume1/homes/$USER/scripts/getmail/getmail \
  -r /volume1/homes/$USER/scripts/getmail_gmail.conf \
  -g /volume1/homes/$USER/scripts/
If everything is fine, you can add the following entry to your crontab (/etc/crontab):
*/5 * * * * root /volume1/homes/$USER/scripts/getmail/getmail -r /volume1/homes/$USER/scripts/getmail_gmail.conf -g /volume1/homes/$USER/scripts/
And restart the cron daemon:
syno> /usr/syno/sbin/synoservicectl --restart crond
XMPP server
DNS entries
You will need to add following DNS entries:
_xmpp-client._tcp 0 IN SRV 0 5 5222 yourdomain.tld.
_xmpp-server._tcp 0 IN SRV 0 5 5269 yourdomain.tld.
Values are detailed below:
| Domain | Type | Priority | Weight | Port |
|---|---|---|---|---|
| _xmpp-client._tcp.yourdomain.tld | SRV | 0 | 5 | 5222 |
| _xmpp-server._tcp.yourdomain.tld | SRV | 0 | 5 | 5269 |
Installation of ejabberd
I used to use prosody as XMPP server but was not able to find it as a Synology package. I decided to give a try to ejabberd (available from beta package in SynoCommunity repository). It works fine!
To install it, go to Packages Center > Parameters > Packages sources and add following source:
- Name: SynoCommunity
- URL: http://packages.synocommunity.com/
Once done, you should have a new repository with ejabberd (you may need to display beta versions from Parameters > beta).
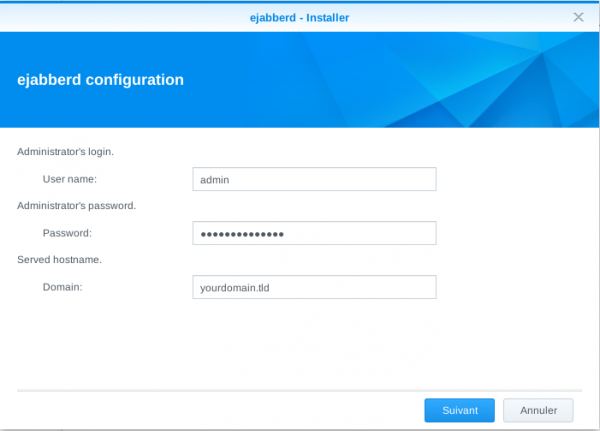
When prompted, enter the login and password for the admin account that will manage ejabberd, as well as your domain name:


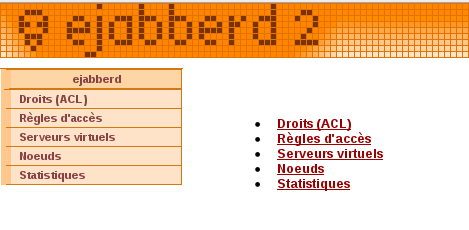
Once the installation is complete, go to http://yourserver:5280/admin/. You should be presented with the administration panel as follows:
Add users
To add a user, go to: Virtual Servers > [yourdomain] > Users.
Issue Certificate
I recommend to install a certificate to encrypt your communications. Please note that it won't be accepted by Google. For this reason, we will configure encryption as optional.
Generate a CSR (Certificate Signing Request) locally:
> openssl genrsa -out /etc/ssl/private/ejabberd.key 4096
> openssl req -new -key /etc/ssl/private/ejabberd.key \
   -out /etc/ssl/ejabberd.csr -utf8 -batch -subj "/CN=yourdomain.tld/"
On StartSSL, go to Certificates Wizard and select "Web Server SSL/TLS Certificate" from the "Certificate Target" dropdown. Then click "Continue". Press the "Skip" button since you already have your CSR.
Paste the content of your CSR in the StartSSL form and press "Continue".
Click "Next", then select the domain your certificate will be valid for from the domains dropdown and provide a subdomain (e.g. ejabberd). Press "Continue" until you're presented with the PEM encoded certificate. Copy it and save it on your server under /etc/ssl/public/ejabberd.crt (first create the "/etc/ssl/public/" directory).
To be able to process your certificate, ejabberd requires that you concatenate the private and public keys:
> wget http://www.startssl.com/certs/sub.class1.server.ca.pem
> cat /etc/ssl/public/ejabberd.crt /etc/ssl/private/ejabberd.key sub.class1.server.ca.pem > /volume1/@appstore/ejabberd/etc/ejabberd/ejabberd.pem
Configuration
Now, it's time to tell ejabberd we want to use our certificate.
> cd /volume1/@appstore/ejabberd/etc/ejabberd/
> vi ejabberd.cfg
And modify this section as follows:
%%%.   ===============
%%%'   LISTENING PORTS

%%
%% listen: The ports ejabberd will listen on, which service each is handled
%% by and what options to start it with.
%%
{define_macro, 'CERT_LOCATION', "/volume1/@appstore/ejabberd/etc/ejabberd/ejabberd.pem"}.

{listen,
 [

  {5222, ejabberd_c2s, [

                        %%
                        %% If TLS is compiled in and you installed a SSL
                        %% certificate, specify the full path to the
                        %% file and uncomment this line:
                        %%
                        {certfile, 'CERT_LOCATION'}, starttls,
                        {access, c2s},
                        {shaper, c2s_shaper},
                        {max_stanza_size, 65536}
                       ]},

[...SNIP...]
%%
%% s2s_use_starttls: Enable STARTTLS + Dialback for S2S connections.
%% Allowed values are: false optional required required_trusted
%% You must specify a certificate file.
%%
{s2s_use_starttls, optional}.

%%
%% s2s_certfile: Specify a certificate file.
%%
{s2s_certfile, 'CERT_LOCATION'}.

[...SNIP...]
Restart ejabbered
Now restart ejabberd:
> /volume1/@appstore/ejabberd/sbin/ejabberdctl restart
ipkg
Description
With ipkg, you can install packages on your Synology, as you would do with apt/dpkg on a Debian box.
Installation
Supported architectures
ipkg can be easily installed on supported architectures. For example on a DS3612xs (Intel x86 architecture), you will just need to issue following commands:
DiskStation> wget http://ipkg.nslu2-linux.org/feeds/optware/syno-i686/cross/stable/syno-i686-bootstrap_1.2-7_i686.xsh
DiskStation> sh syno-i686-bootstrap_1.2-7_i686.xsh
Add following paths to the PATH environment variable in /root/.profile:
/opt/bin:/opt/sbin
Reload the profile:
DiskStation> source /etc/profile
Then run:
DiskStation> ipkg update
DiskStation> ipkg upgrade
Non supported architectures (yet)
Some recent Synology devices run unsupported architectures (e.g. DS214+ running Marvell Armada XP). You won't find any bootstrap yet. However, there are some tutorials that explain how to install and run ipkg:
- http://eticweb.info/2014/12/18/installer-ipkg-sur-synology-ds214/
- http://blog.nouveauxterritoires.fr/fr/2014/04/23/installer-la-commande-ipkg-sur-un-nas-synology-recent/

Cacti
Description
Bu default, there is no real monitoring solution installed on a Synology. Cacti is an excellent web based application that will monitor our NAS.
Prerequisites
First install ipkg. Then run:
DiskStation> ipkg install net-snmp
DiskStation> ipkg install rrdtool
Install Cacti
Downlad and install Cacti:
DiskStation> wget http://www.cacti.net/downloads/cacti-0.8.8c.tar.gz
DiskStation> tar xzvf cacti-0.8.8c.tar.gz
DiskStation> mv cacti-0.8.8c/ /volume1/web/cacti/
DiskStation> chown -R http /volume1/web/cacti/
Create the database:
DiskStation> mysql -u root -p
MariaDB [(none)]> create database cacti;
MariaDB [(none)]> create user cacti@localhost identified by 'cactipassword';
MariaDB [(none)]> grant all privileges on cacti.* to cacti@localhost;
MariaDB [(none)]> \q
Popuplate the database:
DiskStation> mysql -u root -p cacti < /volume1/web/cacti/cacti.sql
Configuration
Now, edit /volume1/web/cacti/include/config.php and adapt to match your settings:
$database_type = "mysql";
$database_default = "cacti";
$database_hostname = "localhost";
$database_username = "cacti";
$database_password = "cactipassword";
$database_port = "3306";
$database_ssl = false;
Go to Control Panel > Web services > PHP parameters tab and add following paths to open_basedir:
/usr/bin:/opt/bin
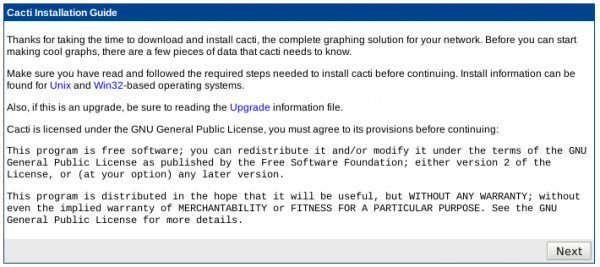
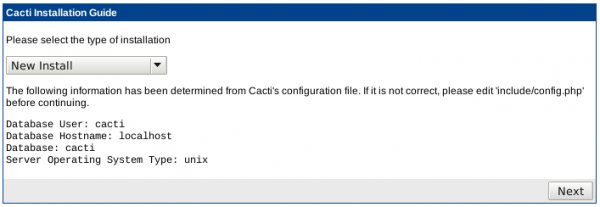
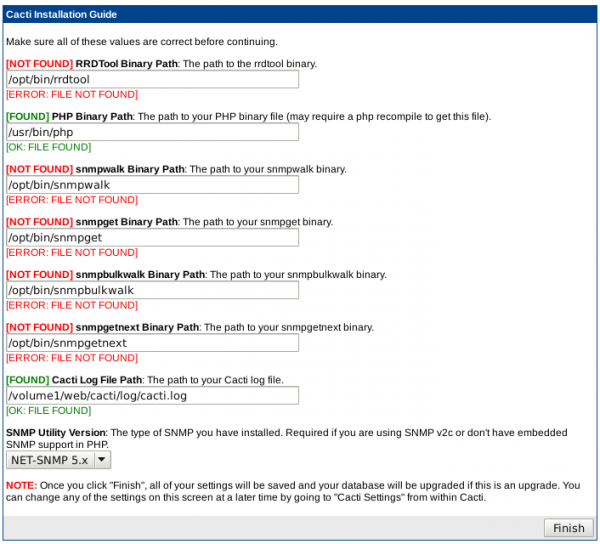
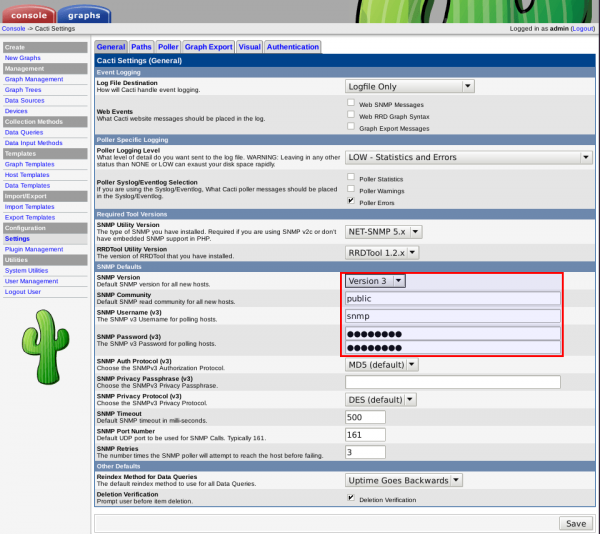
To finish the configuration, point your browser to http://<your.ip>/cacti/install/ and follow the configuration process as depicted below:
login with admin/admin and change the cacti password.
Add following line to your /etc/crontab file:
*/5 * * * * root /usr/bin/php /volume1/web/cacti/poller.php > /dev/null 2>&1
Restart crontab:
DiskStation> /usr/syno/sbin/synoservicectl --restart crond
cron
Edit crontab
Add entries to /etc/crontab
Example
> cat /etc/crontab
#minute	hour	mday	month	wday	who	command
[SNIP]
*/15	*	*	*	*	root	su - admin -c "/usr/bin/php /volume1/web/rssreader/update.php --feeds --quiet"

Restart crond
> /usr/syno/sbin/synoservicectl --restart crond
SSL Certificate
Manually renew SSLCert
If you need to manually renew SSLCert certificate, here is how to do it:
- Ensure you have port forwarding on your Internet Box (80/tcp->syno:80/tcp)
- Open port 80/tcp on your Synnology
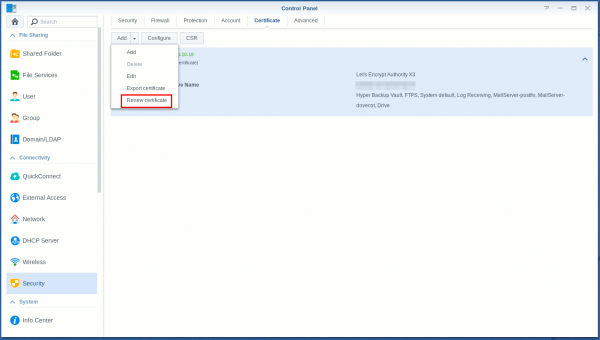
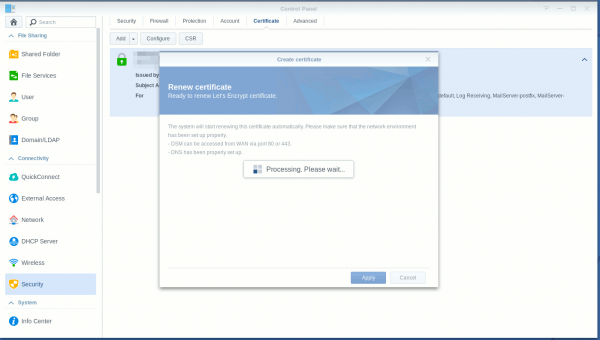
- Go to Control Panel > Security > Certificate and select Add > Renew certificate from the dropdown:
- If you want to do it with CLI:
$ sudo /usr/syno/sbin/syno-letsencrypt renew-all -vv
Comments
Keywords: synology nas mail xmpp ejabberd

