OSSEC

Introduction
Description
OSSEC is an Open Source Host-based Intrusion Detection System (HIDS). It performs log analysis, file integrity checking, policy monitoring, rootkit detection, real-time alerting and active response.
It runs on most operating systems, including Linux, MacOS, Solaris, HP-UX, AIX and Windows.
It has 2 frontends which installation and usage are described in this article: a Command Line Interface (CLI) and a Web User Interface (WUI).
Once properly configured, the OSSEC server can automatically send the events per mail.
Architecture
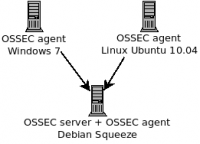
The following has been tested on following platforms:
- Server:
- Debian Squeeze (v6)
- Agents:
- Debian Squeeze (v6)
- Linux Ubuntu Lucid Lynx (10.04)
- Windows 7 (Home Premium Edition)
The Debian Squeeze box hosts the server and the agent.
Installation / Uninstall script
Installation of the server
The server component has been installed on a Debian Squeeze box.
Download OSSEC and check the integrity:
# cd /usr/local/src/
# wget http://www.ossec.net/files/ossec-hids-2.6.tar.gz
# wget http://www.ossec.net/files/ossec-hids-2.6_checksum.txt
# cat ossec-hids-2.6_checksum.txt
MD5 (ossec-hids-2.6.tar.gz) = f4140ecf25724b8e6bdcaceaf735138a
SHA1 (ossec-hids-2.6.tar.gz) = 258b9a24936e6b61e0478b638e8a3bfd3882d91e
MD5 (ossec-agent-win32-2.6.exe) = 7d2392459aeab7490f28a10bba07d8b5
SHA1 (ossec-agent-win32-2.6.exe) = fdb5225ac0ef631d10e5110c1c1a8aa473e62ab4
# md5sum ossec-hids-2.6.tar.gz
f4140ecf25724b8e6bdcaceaf735138a  ossec-hids-2.6.tar.gz
Uncompress the tarball and install OSSEC server:
# tar zxvf ossec-hids-2.6.tar.gz
# cd ossec-hids-2.6/
# ./install.sh
When required, select "server" as the installation type and follow the installation instructions displayed on the screen. Once done, start the server:
# /var/ossec/bin/ossec-control start
Installation of an agent
Windows host
First download the agent for Windows: http://www.ossec.net/files/ossec-agent-win32-2.6.exe and check the integrity of the file.
Then follow the installation instructions and paste the key provided by the server.
Linux based host
To install an agent on a Linux-based host, proceed as follows.
Download the tarball and check the integrity:
# cd /usr/local/src/
# wget http://www.ossec.net/files/ossec-hids-2.6.tar.gz
Then uncompress and install:
# ossec-hids-2.6.tar.gz
# cd ossec-hids-2.6/
# ./install.sh
When required, select "agent" as the installation type and follow the installation instructions.
To be able to activate the agent, it needs the authentication key generated by the server.
# /var/ossec/bin/manage_agents

****************************************
* OSSEC HIDS v2.6 Agent manager.       *
* The following options are available: *
****************************************
   (I)mport key from the server (I).
   (Q)uit.
Choose your action: I or Q: I

* Provide the Key generated by the server.
* The best approach is to cut and paste it.
*** OBS: Do not include spaces or new lines.

Paste it here (or '\q' to quit): MDA0IG5hbWVvZnRoZWFnZW50IDE5M
i4xNjguMTAwLjIxIDM3MDgwMmQ1ZmQyZjExMzZlNzg1MWY5YWQ2MjExODJkODc
zZGRkYWYyMjY4NWZiZWFlOTg2MDlmMTU1MjBkZDc=
Agent information:
   ID:004
   Name:nameoftheagent
   IP Address:192.168.100.21

Confirm adding it?(y/n): y
Installation of the Web User Interface (WUI)
Download the web ui tarball and check the integrity:
# cd /usr/local/src/
# wget http://www.ossec.net/files/ui/ossec-wui-0.3.tar.gz
Uncompress and move files to your web directory:
# tar xzvf ossec-wui-0.3.tar.gz
# mv ossec-wui-0.3 /var/www/ossec/
Go to the web directory and start the setup to create a user:
# cd /var/www/ossec/
# ./setup.sh
Edit the group file:
# vim /etc/group
And add your web server user (e.g. www-data) to the ossec group:
Change:
ossec:x:1001:
To:
ossec:x:1001:www-data
Fix the permissions for the tmp/ directory.
# cd /var/ossec/
# chmod 770 tmp/
# chgrp www tmp/
# /etc/init.d/apache2 restart
You should now be able to access the web interface. Point your browser to:
http ://ossec-server/ossec/
Uninstall script
To uninstall OSSEC, just paste the following script in a file, give it execution privileges and execute it.
#!/bin/bash
# a simple script to uninstall ossec (tested on debian)
# Author: Han The Thanh <h a n t h e t h a n h @ g m a i l . c o m>
# Public domain.

# this script has been tested on debian; it should also work on other linux
# systems but I have not tested. If you want to be careful and need to see what
# would be done without executing any real action, uncomment the following line:
# dryrun="echo "

set -e

. /etc/ossec-init.conf

dirs="$DIRECTORY"
files=`ls /etc/init.d/ossec /etc/rc[0-9S].d/[SK][0-9][0-9]ossec`
users=`egrep '^ossec' /etc/passwd | sed 's/:.*//'`
groups=`egrep '^ossec' /etc/group | sed 's/:.*//'`

deluser=`which deluser` || true
if [ -z "$deluser" ]; then
    deluser="userdel"
fi

delgroup=`which delgroup` || true
if [ -z "$delgroup" ]; then
    delgroup="groupdel"
fi

echo ""
echo "I am going to remove the following:"

echo ""
echo ">>> Files:"
for f in $files; do
    ls -l $f
done

echo ""
echo ">>> Directory:"
for f in $dirs; do
    ls -ld $f
done

echo ""
echo ">>> Users:"
echo $users

echo ""
echo ">>> Group:"
echo $groups

echo ""
echo "If you have not backed up your config file(s), they will be lost forever!"

read -p "Is this want you want (yes/no)? "
if [ "$REPLY" = "yes" ]; then
    $dryrun /etc/init.d/ossec stop
    $dryrun rm -f $files
    $dryrun rm -rf $dirs
    for u in $users; do
        $dryrun $deluser $u
    done
    for g in $groups; do
        $dryrun $delgroup $g
    done
fi
Usage
OSSEC Command Line Interface (CLI)
Add an agent

# cd /var/ossec/bin/
# ./manage_agents
****************************************
* OSSEC HIDS v2.6 Agent manager.       *
* The following options are available: *
****************************************
   (A)dd an agent (A).
   (E)xtract key for an agent (E).
   (L)ist already added agents (L).
   (R)emove an agent (R).
   (Q)uit.
Choose your action: A,E,L,R or Q: A

- Adding a new agent (use '\q' to return to the main menu).
  Please provide the following:
   * A name for the new agent: nameoftheagent
   * The IP Address of the new agent: 192.168.100.21
   * An ID for the new agent[004]: <<ENTER>>
Agent information:
   ID:004
   Name:nameoftheagent
   IP Address:192.168.100.21

Confirm adding it?(y/n): y
Agent added.
Extract key
To extract the key:
****************************************
* OSSEC HIDS v2.6 Agent manager.       *
* The following options are available: *
****************************************
   (A)dd an agent (A).
   (E)xtract key for an agent (E).
   (L)ist already added agents (L).
   (R)emove an agent (R).
   (Q)uit.
Choose your action: A,E,L,R or Q: E

Provide the ID of the agent to extract the key (or '\q' to quit): 004

Agent key information for '004' is:
MDA0IG5hbWVvZnRoZWFnZW50IDE5Mi4xNjguMTAwLjIxIDM3MDgwMmQ1ZmQyZjExMzZlNzg1MWY5YW
Q2MjExODJkODczZGRkYWYyMjY4NWZiZWFlOTg2MDlmMTU1MjBkZDc=
Remove an agent
# cd /var/ossec/bin/
# ./manage_agents
****************************************
* OSSEC HIDS v2.6 Agent manager.     *
* The following options are available: *
****************************************
   (A)dd an agent (A).
   (E)xtract key for an agent (E).
   (L)ist already added agents (L).
   (R)emove an agent (R).
   (Q)uit.
Choose your action: A,E,L,R or Q: R

Available agents:
   ID: 001, Name: test1, IP: 192.168.100.2
   ID: 002, Name: test2, IP: 192.168.100.3
   ID: 003, Name: test3, IP: 192.168.100.4
   ID: 004, Name: nameoftheagent, IP: 192.168.100.21
Provide the ID of the agent to be removed (or '\q' to quit): 004
Confirm deleting it?(y/n): y
Agent '004' removed.
List agents (and other tasks)
It is possible to list agents with the utilities listed in this section
# /var/ossec/bin/agent_control -l
# /var/ossec/bin/list_agents -a
# /var/ossec/rootcheck_control -l
# /var/ossec/syscheck_control -l
# /var/ossec/syscheck_update -l
Utilities
agent_control
There is a utility called agent_control in /var/ossec/bin/ that enables to control remote agents. Here is a list of available options:
- -l
- List available (active or not) agents.
- -lc
- List active agents.
- -i <id>
- Extracts information from an agent.
- -R <id>
- Restarts agent.
- -r -a
- Runs the integrity/rootkit checking on all agents now.
- -r -u <id>
- Runs the integrity/rootkit checking on one agent now.
- -b <ip>
- Blocks the specified ip address.
- -f <ar>
- Used with -b, specifies which response to run.
- -L
- List available active responses.
- -s
- Changes the output to CSV (comma delimited).
list_agents
This utility enables to list agents. Here is the list of available options:
- -h
- This help message.
- -a
- List all agents.
- -c
- List the connected (active) agents.
- -n
- List the not connected (active) agents.
rootcheck_control
This utility manages the policy and auditing database. Available options are:
- -h
- This help message.
- -l
- List available (active or not) agents.
- -lc
- List only active agents.
- -u <id>
- Updates (clear) the database for the agent.
- -u all
- Updates (clear) the database for all agents.
- -i <id>
- Prints database for the agent.
- -r
- Used with -i, prints all the resolved issues.
- -q
- Used with -i, prints all the outstanding issues.
- -L
- Used with -i, prints the last scan.
- -s
- Changes the output to CSV (comma delimited).
syscheck_control
This utility manages the integrity checking database. Available options are:
- -h
- This help message.
- -l
- List available (active or not) agents.
- -lc
- List only active agents.
- -u <id>
- Updates (clear) the database for the agent.
- -u all
- Updates (clear) the database for all agents.
- -i <id>
- List modified files for the agent.
- -r -i <id>
- List modified registry entries for the agent (Windows only).
- -f <file>
- Prints information about a modified file.
- -z
- Used with the -f, zeroes the auto-ignore counter.
- -d
- Used with the -f, ignores that file.
- -s
- Changes the output to CSV (comma delimited).
syscheck_update
This utility updates the integrity check database. Available options are:
- -h
- This help message.
- -l
- List available agents.
- -a
- Update syscheck database for all agents.
- -u <id>
- Update syscheck database for a specific agent.
- -u
- local Update syscheck database locally.
Start/stop the server
# cd /var/ossec/bin/
# ./ossec-control {start|stop|restart|status|enable|disable}
OSSEC Web User Interface (WUI)
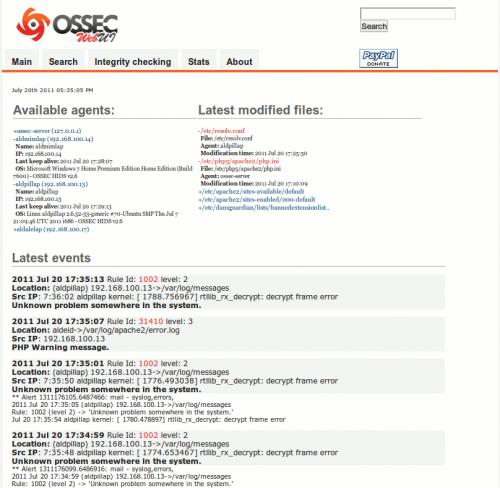
List agents and events
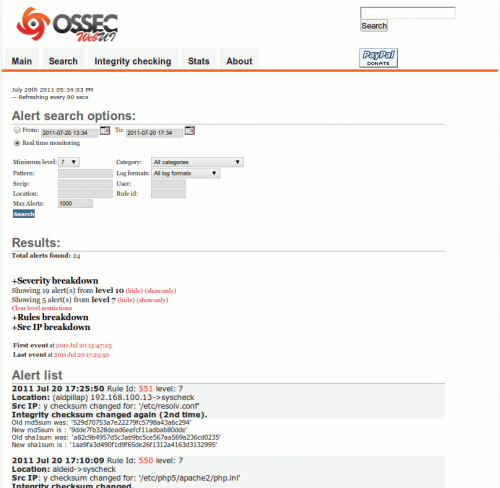
Search
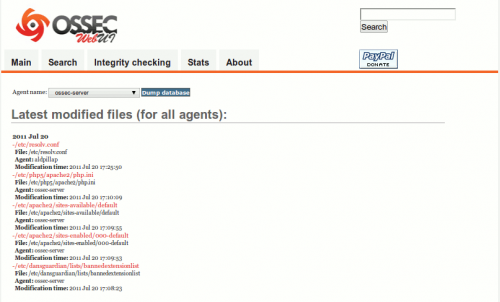
Integrity Checking
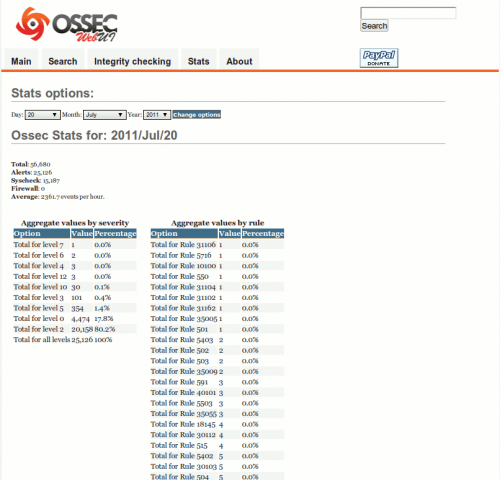
Stats
Example of mail notifications
OSSEC HIDS Notification.
2011 Jul 20 18:58:09

Received From: (aldpillap) 192.168.100.13->/var/log/messages
Rule: 1002 fired (level 2) -> "Unknown problem somewhere in the system."
Portion of the log(s):

Jul 20 18:58:59 aldpillap kernel: [ 6755.240673] rtllib_rx_decrypt: decrypt frame error

--END OF NOTIFICATION
OSSEC HIDS Notification.
2011 Jul 19 22:34:52

Received From: (testlab) 192.168.100.14->WinEvtLog
Rule: 18119 fired (level 3) -> "First time this user logged in this system."
Portion of the log(s):

WinEvtLog:
 Security: AUDIT_SUCCESS(4624):
 Microsoft-Windows-Security-Auditing: test: testlab: testlab:
 An account was successfully logged on.
Subject:
 Security ID:  S-1-5-18
 Account Name:  testlab$
 Account Domain:  WORKGROUP
 Logon ID:  0x3e7
 Logon Type:   7
New Logon:
 Security ID:  S-1-5-21-66137412-3182202153-2442130688-1000
 Account Name: test
 Account Domain:  testlab
 Logon ID:  0x8b55a
 Logon GUID:  {00000000-0000-0000-0000-000000000000}
Process Information:
 Process ID:  0x1d8
 Process Name:  C:\Windows\System32\winlogon.exe
Network Information:
 Workstation Name: testlab
 Source Network Address: 127.0.0.1
 Source Port:  0
Detailed Authentication Information:
 Logon Process:  User32
 Authentication Package: Negotiate
 Transited Services: -
 Package Name (NTLM only): -
 Key Length:  0
This event is generated when a logon session is created.
It is generated on the computer that was accessed.
OSSEC HIDS Notification.
2011 Jul 21 06:25:06

Received From: aldeid->/var/log/auth.log
Rule: 40101 fired (level 12) -> "System user successfully logged to the system."
Portion of the log(s):

Jul 21 06:25:05 aldeid su[5730]: + ??? root:nobody
Errors
If you have such an error while starting the server:
# /var/ossec/bin/ossec-control start
Starting OSSEC HIDS v2.6 (by Trend Micro Inc.)...
OSSEC analysisd: Testing rules failed. Configuration error. Exiting.
Started ossec-maild...
Started ossec-execd...
Started ossec-analysisd...
Started ossec-logcollector...
Started ossec-remoted...
Started ossec-syscheckd...
Started ossec-monitord...
Completed.
Then jsut create a symbolic link as follows:
# ln -s /var/ossec/bin/ossec-logtest /var/ossec/ossec-logtest
